Penggerak ODBC MySQL pada BlankOn

Kadang kita masih membutuhkan aplikasi lama dan ternyata masih bisa dijalankan dengan wine, namun kendalanya membutuhkan koneksi ke database MySQL melewat penggerak ODBC ( ODBC Driver MySQL ). Kasus ini banyak ditemui tatkala kita akan memigrasikan sebuah perusahaan yang sudah lama mempunya sistem / aplikasi yang berjalan, terutama yang berbasis foxpro.

Tutorial Ubuntu Server

Jika kemarin kita sudah membaca artikel tentang apa itu Sistem Operasi dan Terminal Linux, kali ini saya akan berbagi bagaimana cara instal Linux Ubuntu lengkap agar sistem operasi ini dapat berjalan dengan baik di depan komputer.

GIMP | Aplikasi image editor Linux yang handal

GNU Image Manipulation Program atau yang lebih dikenal dengan sebutan GIMP adalah perangkat lunak untuk manipulasi grafik berbasis raster..

9 Hal Wajib dilakukan Setelah Memasang BlankOn Suroboyo

Destop BlankOn Suroboyo punya cerita unik sendiri. Diberi nama Manokwari Shell. Manokwari Shell adalah destop shell untuk GNOME 3 dengan Gtk+ dan antarmuka HTML5. Destop ini juga sangat ringan dan sederhana, namun sangat lengkap dari sisi fitur.

Showing posts with label Linux. Show all posts

Wednesday, April 8, 2015

Install Gnome Tweak Tool Di Ubuntu 12.04 LTS


Gnome Tweak Tool adalah suatu applikasi yang memudahkan kita untuk mengcostumize ubuntu kita. Seperti mengubah font, theme, icon dan lain sebagainya.
Untuk menginstallnya di ubuntu 12.04, jalankan perintah berikut :
$ sudo apt-get install gnome-tweak-tool

Interface Gnome Tweak Tool :

Hanya yang saya bisa share pada kesempatan kali ini. Kurang dan lebihnya mohon di maafkan.
TERIMA KASIH ..!!

Cara Install Cairo Dock 3.0 Di Ubuntu 12.04 LTS


Pada postingan sebelumnya saya share Cara Install Gimp 2.8 Di Ubuntu 12.04 LTS. Dan pada posting kali ini saya akan share Cara Install Cairo Dock 3.0 Di Ubuntu 12.04 LTS. Cairo Dock ini saya jadikan ganti Unity sebagai interface pada ubuntuku yaitu Ubuntu 12.04 LTS. Kenapa saya menggunakan Cairo Dock sebagai ganti dari unity? Karena menurutku tampilannya keren dan terasa enak pada laptop jadulku. Berikut tampilan desktop ubuntuku dengan cairo dock sebagai interfacenya.


Untuk install Cairo Dock 3.0 Di Ubuntu 12.04, silahkan jalankan perintah berikut :

$ sudo add-apt-repository ppa:cairo-dock-team
$ sudo apt-get update
$ sudo apt-get install cairo-dock-plug-ins


Setelah proses instalasi selesai, slahkan restart atau log out komputer anda. Dan pada window login, silahkan pilih Cairo-Dock (Gnome+Effects) atau Cairo-Dock (Gnome no effects)


Setelah itu saya ucapkan selamat menikmati .. :D :D
Terima Kasih …!!

Saturday, April 4, 2015

CLONING USB FLASHDISK DI UBUNTU


Akhirnya berkat bantuan om Google yang mengarahkan saya pada sebuah postingan di ubuntuforum.org
Berikut langkah persiapannya:
  • Pastikan sudah disiapkan usb flashdisk source (master yang akan dikloning) saya sebut flashdisk1 dan usb flasdisk destination (usb flashdisk tujuan) saya sebut flashdisk2. Pastikan juga space yang dimiliki oleh flashdisk2 sama persis dengan flashdisk1. lebih direkomendasikan merek dan tipenya sama persis hee untuk  menghindari perbedaan block sector yang dimiliki flashdisk2 sebagai copy dari flashdisk1.
  • Masukkan flashdisk1 ke usb port, untuk ubuntu akan langsung di mounting untuk melihatnya bisa dicek dengan perintah "df" pada console. misalnya sdc1
  • Masukkan flashdisk2 ke usb port, untuk ubuntu akan langsung di mounting untuk melihatnya bisa dicek dengan perintah "df" pada console. misalnya sdd1
Setelah persiapan diatas ok, yang harus diperhatikan lagi adalah bahwa perintah untuk kloning ini tidak akan berakibat fatal apabila terjadi kekeliruan dalam persiapan diatas.
Langkah selanjutnya adalah menjalankan 1 baris perintah pada console (level root atau sudo terlebih dahulu) sebagai berikut:

dd if=/dev/sdc1 of=/dev/sdd1 bs=4096

sdc1 = flasdisk sumber/master atau flashdisk1
sdd1 = flasdisk tujuan atau flashdisk2
Lamanya proses kloning ini tergantung dari space usb flashdisk yang digunakan, untuk memastikan prose berjalan bisa dilihat dari lampu indicator usb flashdisk (apabila ada). Apabila proses sudah selesai, pastikan informasi yang diberikan sesuai dengan kondisi yang sebenarnya misalnya jumlah data yang tersalin dari flashdisk1 ke flashdisk2 harus sama persis.
INGAT!! jangan salah menentukan sumber dan tujuan, karena akan berakibat hilangnya data pada flasdisk sumber. dan untuk diketahui perintah diatas tidak akan meminta konfirmasi alias akan langsung dieksekusi oleh sistem.
Detil mengenai perintah "dd" bisa dilihat dengan perintah "man dd" pada console/terminal :)
ok, selamat mencoba dan semoga bermanfaat

Wednesday, February 25, 2015

How To Disable The User List Or Guest Session


Quick tips for Ubuntu / LightDM users: if you want to hide the LightDM login screen user list and / or the Guest Session for security concerns, because there are too many users or whatever other reason, here's how to do it.
Ubuntu LightDM Unity Greeter
Default LightDM login screen (Unity Greeter) with user list and Guest Session enabled

1. To disable the LightDM login screen user list and / or Guest Session, firstly create the /etc/lightdm/lightdm.conf.d/ folder in case it doesn't exist, by using the following command:
sudo mkdir -p /etc/lightdm/lightdm.conf.d

2. Next, you need to create a file called 50-my-custom-config.conf under /etc/lightdm/lightdm.conf.d/ To open/create this file using Gedit (as root), use the following command:
gksu gedit /etc/lightdm/lightdm.conf.d/50-my-custom-config.conf

3.a. To hide the LightDM login screen user list (which means you'll have to manually enter your username), paste the following in this file (50-my-custom-config.conf):
[SeatDefaults]
greeter-hide-users=true
greeter-show-manual-login=true
Then save the file.

Here's how LightDM (with Unity Greeter) will look after this change:

Ubuntu LightDM disabled user list

3.b. To disable the LightDM Guest Session, paste the following lines in the /etc/lightdm/lightdm.conf.d/50-my-custom-config.conf file:
[SeatDefaults]
allow-guest=false
Then save the file.

Here's a screenshot with the Guest Session disabled in LightDM (with Unity Greeter):

Ubuntu LightDM disabled guest session

3.c. Of course, you can combine the two. So if you want to hide the LightDM login screen user list and also disable the Guest Session, paste this in the /etc/lightdm/lightdm.conf.d/50-my-custom-config.conf file:
[SeatDefaults]
greeter-hide-users=true
greeter-show-manual-login=true
allow-guest=false
Then save the file.

Here's a screenshot with LightDM (Unity Greeter) in which the user list was hidden and the Guest Session was disabled:

Ubuntu LightDM disabled user list guest session

4. And finally, you need to restart LightDM (a logout is not enough). To do this, press ALT + F2 and copy/paste the following command:
gksu service lightdm restart
Then press ENTER.

You can also simply restart your system.

Why not use "sudo service lightdm restart" in a terminal? Well, for some reason LightDM can't be restarted from a terminal with 'sudo'. However, you can also restart LightDM by switching to a tty (to switch to tty1 press CTRL + ALT + F1; to switch back, use CTRL + ALT + F7) and then using the "sudo service lightdm restart" command.


How to revert the changes


To revert the changes made by following the instructions above, all you need to do is remove the /etc/lightdm/lightdm.conf.d/50-my-custom-config.conf file, by using the following command:
sudo rm /etc/lightdm/lightdm.conf.d/50-my-custom-config.conf

Then, restart LightDM as explained under step 4 or reboot your computer.
Mapping Network Drive di Ubuntu 10.04 & 12.04

Kali ini saya akan share cara Mapping Network Drive di Ubuntu 10.04
Pertama tama, saratnya adalah sebuah komputer dengan OS Ubuntu 10.04/12.04 dong hehehee...
langkah berikutnya untuk menjalankan Mapping Network Drive ini menggunakan "fstab" maka dari itu kita harus install "samba & smbfs"
caranya buka terminal :

$sudo apt-get install samba
$sudo apt-get install smbfs
$mkdir file

*file=nama folder/direktori yang akan di share

sebelumnya kita buat folder - folder yang akan di gunakan untuk meletak kan mapping terlebih dulu
contoh:
buka home folder dan di dalam "/home/userku" kita create folder misal "Data1"
berikutnya lakukan configure di "fstab"
caranya buka terminal :

$sudo gedit /etc/fstab

lalu tambahkan sources code berikut di baris paling bawah :

//ipserverku/sharefolder /home/userku/Data1 cifs username=userku,password=Passwordku,file_mode=0777,dir_mode=0777,nounix,nobrl 0 0

lalu save
berikutnya kita lakukan pengetesan, apakah sudah bisa atau belum.
caranya:
buka terminal :

$sudo mount -a

*mount -a = mount semua folder/drive
*Jika ingin umount 1 drive/folder saja ketik :
$sudo umount <lokasi / path folder yang ingin diunmount>
Misalnya : $sudo umount /home/<namauser>/<nama folder>

jika sudah berhasil akan terlihat drive Data1 di bagian kiri Home Folder kita

dan cara ini akan otomatis ter mount saat komputer di hidupkan
selamat mencoba semoga berhasil
salam

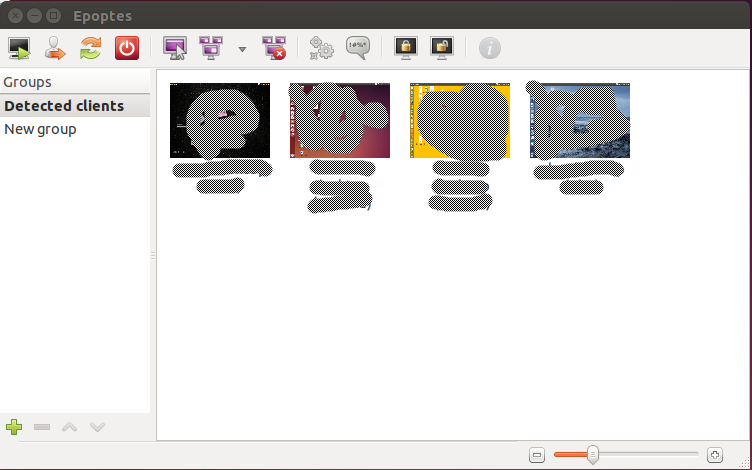
Epoptes in linux mint / Debian / Ubuntu and netsupport school for linux

Epoptes is an open source computer lab management and monitoring tool. It allows you (admin) to manage everything such as screen broadcasting, monitoring, remote command execution, message sending, screen locking, Sound muting, shutdown, restart, logoff the clients and much more. I’m going to install Epoptes in ubuntu

Epoptes is currently support Linux Mint, Ubuntu, Debian and openSUSE.

Epoptes Server Installation and Configuration

Use the below command to install Epoptes Server package on your system. Make sure you should have static IP for Epoptes Server system. After installing Epoptes Server you need to add your user (Instead of magesh you need to put your username) to epoptes groups, so that the user can launch the GUI and control clients.

# Install Epoptes Server package on your system #
magesh@magesh-desktop:~$ sudo apt-get install epoptes 
 
# Add the users to epoptes groups #
magesh@magesh-desktop:~$ sudo gpasswd -a user epoptes

logoff and logon the system to take effect or Restart it.

Epoptes Client Installation and Configuration

Use the below command to install Epoptes Client package on your system. After installing Epoptes Client When you tring to connect Client to server by default, it will try to connect to the DNS name “server”. If you don’t have a DNS server, you need to add the Epoptes Server IP (Add your server IP instead of us) to hosts file, so that Epoptes Client knows about Epoptes Server. Finally fetch the certificate to connect with server.
# Install Epoptes Client package on your system #
magesh@magesh-desktop:~$ sudo apt-get install epoptes-client

# Add Epoptes server IP to Epoptes Client PC hosts file #
magesh@magesh-desktop:~$ sudo nano /etc/hosts
192.168.1.113   server

# Fetching the OpenSSL certificate from the server #
magesh@magesh-desktop:~$ sudo epoptes-client -c
logoff and login the system to take effect or Restart it.

Note : No need to modify anything on server end, If you face any issues use the below command to check server syntax error.
# checking syntax error on server #
magesh@magesh-desktop:~$ sh -n /etc/default/epoptes

Launch Epoptes from server machine

Navigate to your computer search and type “epoptes” then hit the icon to launch it.
manage-and-monitor-your-office-pc-with-epoptes-in-linux-mint-debian-ubuntu-1
Hope! Now you can control your office system.

Cara Install WinRAR 5.11.1 on Ubuntu 14.04 & Other Linux Ubuntu Derivatives

Install WinRAR on Linux Ubuntu 1404
How to install WinRAR 5.11 on Ubuntu 14.04 (Linux) systems. Install WinRAR 5.11 on 32 bit Ubuntu 14.04 and install WinRAR 5.11 on 64 bit Ubuntu 14.04 system.
WinRAR is an archiving utility that completely supports RAR and ZIP archives and is able to unpack CAB, ARJ, LZH, TAR, GZ, ACE, UUE, BZ2, JAR, ISO, 7Z, Z archives.  The latest version of the WinRAR 5.11 comes with the following bug fixes and improvements:
a) WinRAR 5.10 did not set “hidden”, “read-only” and “system”  file attributes when unpacking ZIP archives;
b) WinRAR 5.10 failed to update self-extracting RAR archives containing nested ZIP archives stored without compression;
c) ZIP archive created with “Do not store paths” option included unnecessary empty name records for folders;
d) archived files could have 1 hour modification time error in Windows XP;
e) deleting a file in RAR5 solid archive containing files stored with -ver switch caused such files to lose version information;
f) black rectangles were displayed instead of toolbar buttons in 16- and 24- bit screen color modes and Windows custom text size larger than 100%.
The WinRAR 5.11 comes with the added extraction support for ZIP and ZIPX archives using BZIP2, LZMA and PPMd compression.

How to install WinRAR 5.11 on 32 bit Ubuntu 14.04

Open the Terminal and run the following commands to install WinRAR 5.11 on 32 bit Ubuntu 14.04  and other Linux derivatives:

wget rarsoft.com/rar/rarlinux-5.1.1.tar.gz
tar -xzvf rarlinux-5.1.1.tar.gz
cd rar
make
sudo make install

How to install WinRAR 5.11 on 64 bit Ubuntu 14.04

Open the Terminal and run the following commands to install WinRAR 5.11 on 32 bit Ubuntu 14.04  and other Linux derivatives:

wget rarlab.com/rar/rarlinux-x64-5.1.1.tar.gz
tar -xzvf rarlinux-x64-5.1.1.tar.gz
cd rar
make
sudo make install


You can also download and install WinRar 5.11.1 for Windows and Mac OS X systems:
  • WinRAR x86 (32 bit) 5.11
  • WinRAR x64 (64 bit) 5.11
  • RAR for Android
  • RAR 5.11 for Linux
  • RAR 5.11 for Linux x64
  • RAR 5.11 for FreeBSD
  • RAR 5.11 for Mac OS X
Enjoy!
How to Install WinRAR 5.11.1 on Ubuntu 14.04 & Other Linux Ubuntu Derivatives tagged with , , , , , , , .

Internet Download Manager untuk Linux Ubuntu / Debian / Mint

Xtreme Download Manager (xdman) adalah sebuah aplikasi download manager berbasis Java.men-download aplikasi yang kuat manager yang mengklaim bahwa dapat meningkatkan kecepatan download, juga mendukung pause dan melanjutkan rusak men-download dan menangkap FLV video dari situs manapun.

xdman menggunakan algoritma yang canggih dinamis segmentasi, kompresi data dan penggunaan kembali koneksi untuk mempercepat proses download. Xtreme Download Manager mendukung HTTP, HTTPS dan FTP protokol, firewall, proxy server, berkas pengalihan, kue, otorisasi dll Xtreme Download Manager terintegrasi dengan browser untuk menangani download secara otomatis menggunakan integrasi browser Advanced.

Tergantung pada Java Runtime 6 (jre6) atau JRE terbaru, xdman berjalan sempurna di Ubuntu 13.04 atau Ubuntu versi sebelumnya dengan OpenJDK-JRE. Hal ini juga dapat berjalan pada OS utama seperti Windows, Mac OSX, Linux Distribustion yang terpasang JRE.
Xtreme Download Manager 200x200 Xtreme Download Manager: Alternatif Internet Download Manager untuk Linux
xdman Download penuh kegembiraan dekstop i386.iso 200x200 Xtreme Download Manager: Alternatif Internet Download Manager untuk Linux
Konfigurasi Xtreme Download Manager 200x200 Xtreme Download Manager: Alternatif Internet Download Manager untuk Linux


Xdman Features :

Unduh file pada kecepatan maksimum yang mungkin. (5-6 kali lebih cepat)Algoritma segmentasi file dinamis yang canggih, kompresi data & reuse koneksi. 
Download video FLV dari YouTube, MySpaceTV, Google Video atau Any situs Lain
Capture download dari browser apapun (Firefox, Chrome, Internet Explorer, Opera, Safari atau program lain yang mencoba untuk men-download file dari internet)
mendukung HTTP, HTTPS, FTP protokol dengan Authentication, Proxy Server, Cookies, Redirection dll
Resume rusak / mati download yang disebabkan oleh masalah koneksi, listrik atau sesi kedaluwarsa
Sangat portabel. Berjalan pada OS dengan Java SE 6. Tidak perlu untuk instalasi.
Dapat dikonfigurasi untuk melakukan Antivirus otomatis memeriksa, shutdown Sistem di download selesai

Cara Install Xtreme Download Manager
Pada ubuntu, menginstal Xtreme Download Manager sangat mudah. Pertama download Xtreme Download Manager dari here, Anda juga dapat men-download dari terminal dengan mengetikkan perintah:

ketik:

 
sudo apt-get install openjdk-7-jre
 

wget -O xdman.zip http://sourceforge.net/projects/xdman/files/xdman.zip/download

Extract xdman.zip
 
mkdir xdman
unzip xdman.zip -d xdman/

Enter to directory xdman/ and make exexutable file xdman.sh
 
cd xdman/
chmod +x xdman.sh

Run xdman.sh

sudo ./install
./xdman.sh

Wait few second, it will be asking you to integrate xdman with your browser.

ketikkan url di browser utk untuk mengintegrasikan idm ke browser. 
berbeda browser berbeda cara juga

selamat mencoba

by. bagus & prasetyo

Monday, February 16, 2015

Mengatur Keluaran Mic ke Speaker pada BlankOn

Jika anda mempunya laptop maka sudah ada mic dan speakernya, maka laptop ber-BlankOn anda bisa digunakan sebagai alat?siaran disekitar anda, misal untuk mengumumkan sesuatu, siaran dll.
Secara bawaan mic laptop tidak bisa dikeluarkan suaranya lewat speaker dan hanya bisa digunakan untuk chat lewat aplikasi.
Nah cukup dengan mengatur routing suara maka suara dari mic bisa keluar lewat speaker yaitu dengan mengetikkan perintah
pactl load-module module-loopback latency_msec=1

Namun hati hati pada feedback suara yg ditimbulkan, jadi silahkan gunakan aplikasi mixer untuk mengatur volume mic dan speaker sehingga tidak feedback.
jadi tidak hanya tcp/ip saja yg bisa di-routing tetapi suarapun bisa.
Selamat Mencoba

Memasang SSL pada Apache

Untuk keamanan sebuah situs, apalagi digunakan untuk lebih dari satu orang, maka perlu diaktifkan
fitur SSL untuk menghindari aktifitas penyadapan.
Baik langsung saja ke caranya
Terlebih dahulu buatlah file sertifikat:
# apt-get install ssl-cert
# make-ssl-cert /usr/share/ssl-cert/ssleay.cnf /etc/ssl/private/apache.pem

Aktifkan modulnya:
# a2enmod ssl
Edit /etc/apache2/sites-available/default dengan baris-baris awal menjadi seperti ini:
NameVirtualHost *:80
<VirtualHost *:80>
..

Kemudian salin untuk versi SSL-nya:
# cp /etc/apache2/sites-available/default /etc/apache2/sites-available/default-ssl
dan edit /etc/apache2/sites-available/default-ssl menjadi:
NameVirtualHost *:443
<VirtualHost *:443>
SSLEngine on
SSLCertificateFile /etc/ssl/private/apache.pem
..

Aktifkan:
# ln -s /etc/apache2/sites-available/default-ssl /etc/apache2/sites-enabled/000-default-ssl

Lakukan juga perubahan pada (misal) /etc/apache2/sites-available/www.blankon.id:
<VirtualHost *:80>
..
<VirtualHost *:443>
ServerName www.blankon.id
DocumentRoot /home/vhost/www.blankon.id/htdocs/
CustomLog /var/log/apache2/www-ssl-access.log combined
ErrorLog /var/log/apache2/www-ssl-error.log
SSLEngine on
SSLCertificateFile /etc/ssl/private/apache.pem
</VirtualHost>

Restart Apache:
# /etc/init.d/apache2 restart

Kemudian cobalah melalui browser dengan memberi awalan https seperti https://www.blankon.id.

Menggabungkan 2 Gambar menjadi Pdf melalui CLI

Seringkali kita mendapatkan tugas dari kantor yaitu mengirimkan brosur ke pimpinan, mungkin langkah pertama adalah dengan memindai (scan) dan mengirimkan 2 berkas gambar brosur bolak ke
Namun kadang diminta untuk menggabungkan. Nah tidakperlu repot untuk membuka pengolah gambar atau pengolah kata / aplikasi perkantoran.
pimpinan.
Cukup buka terminal di BlankOn anda, ketik :
cd /home/anda/scan/
convert *.png brosure.pdf

maka jadilah 2 gambar atau lebih tadi dalam sebuah berkas pdf
mudahkan ?

salah satu contoh adalah http://bermutu.sepatu.fans.co.id/katalog-sepatu-fans-2013/
pada bagian bawah ada ” Unduh Katalog Sepatu FANS ”

tentang convert sendiri sebenernya kegunaannya banyak, berikut opsi convert lainnya :

convert –help
Version: ImageMagick 6.7.9-3 2013-03-28 Q16 http://www.imagemagick.org
Copyright: Copyright (C) 1999-2012 ImageMagick Studio LLC
Features: OpenMP
Usage: convert.im6 [options …] file [ [options …] file …] [options …] file
Image Settings:
-adjoin join images into a single multi-image file
-affine matrix affine transform matrix
-alpha option activate, deactivate, reset, or set the alpha channel
-antialias remove pixel-aliasing
-authenticate password
decipher image with this password
-attenuate value lessen (or intensify) when adding noise to an image
-background color background color
-bias value add bias when convolving an image
-black-point-compensation
use black point compensation
-blue-primary point chromaticity blue primary point
-bordercolor color border color
-caption string assign a caption to an image
-channel type apply option to select image channels
-colors value preferred number of colors in the image
-colorspace type alternate image colorspace
-comment string annotate image with comment
-compose operator set image composite operator
-compress type type of pixel compression when writing the image
-define format:option
define one or more image format options
-delay value display the next image after pausing
-density geometry horizontal and vertical density of the image
-depth value image depth
-direction type render text right-to-left or left-to-right
-display server get image or font from this X server
-dispose method layer disposal method
-dither method apply error diffusion to image
-encoding type text encoding type
-endian type endianness (MSB or LSB) of the image
-family name render text with this font family
-fill color color to use when filling a graphic primitive
-filter type use this filter when resizing an image
-font name render text with this font
-format “string” output formatted image characteristics
-fuzz distance colors within this distance are considered equal
-gravity type horizontal and vertical text placement
-green-primary point chromaticity green primary point
-intent type type of rendering intent when managing the image color
-interlace type type of image interlacing scheme
-interline-spacing value
set the space between two text lines
-interpolate method pixel color interpolation method
-interword-spacing value
set the space between two words
-kerning value set the space between two letters
-label string assign a label to an image
-limit type value pixel cache resource limit
-loop iterations add Netscape loop extension to your GIF animation
-mask filename associate a mask with the image
-mattecolor color frame color
-monitor monitor progress
-orient type image orientation
-page geometry size and location of an image canvas (setting)
-ping efficiently determine image attributes
-pointsize value font point size
-precision value maximum number of significant digits to print
-preview type image preview type
-quality value JPEG/MIFF/PNG compression level
-quiet suppress all warning messages
-red-primary point chromaticity red primary point
-regard-warnings pay attention to warning messages
-remap filename transform image colors to match this set of colors
-respect-parentheses settings remain in effect until parenthesis boundary
-sampling-factor geometry
horizontal and vertical sampling factor
-scene value image scene number
-seed value seed a new sequence of pseudo-random numbers
-size geometry width and height of image
-stretch type render text with this font stretch
-stroke color graphic primitive stroke color
-strokewidth value graphic primitive stroke width
-style type render text with this font style
-synchronize synchronize image to storage device
-taint declare the image as modified
-texture filename name of texture to tile onto the image background
-tile-offset geometry
tile offset
-treedepth value color tree depth
-transparent-color color
transparent color
-undercolor color annotation bounding box color
-units type the units of image resolution
-verbose print detailed information about the image
-view FlashPix viewing transforms
-virtual-pixel method
virtual pixel access method
-weight type render text with this font weight
-white-point point chromaticity white point
Image Operators:
-adaptive-blur geometry
adaptively blur pixels; decrease effect near edges
-adaptive-resize geometry
adaptively resize image using ‘mesh’ interpolation
-adaptive-sharpen geometry
adaptively sharpen pixels; increase effect near edges
-alpha option on, activate, off, deactivate, set, opaque, copy
transparent, extract, background, or shape
-annotate geometry text
annotate the image with text
-auto-gamma automagically adjust gamma level of image
-auto-level automagically adjust color levels of image
-auto-orient automagically orient (rotate) image
-bench iterations measure performance
-black-threshold value
force all pixels below the threshold into black
-blue-shift factor simulate a scene at nighttime in the moonlight
-blur geometry reduce image noise and reduce detail levels
-border geometry surround image with a border of color
-bordercolor color border color
-brightness-contrast geometry
improve brightness / contrast of the image
-cdl filename color correct with a color decision list
-charcoal radius simulate a charcoal drawing
-chop geometry remove pixels from the image interior
-clamp restrict pixel range from 0 to the quantum depth
-clip clip along the first path from the 8BIM profile
-clip-mask filename associate a clip mask with the image
-clip-path id clip along a named path from the 8BIM profile
-colorize value colorize the image with the fill color
-color-matrix matrix apply color correction to the image
-contrast enhance or reduce the image contrast
-contrast-stretch geometry
improve contrast by `stretching’ the intensity range
-convolve coefficients
apply a convolution kernel to the image
-cycle amount cycle the image colormap
-decipher filename convert cipher pixels to plain pixels
-deskew threshold straighten an image
-despeckle reduce the speckles within an image
-distort method args
distort images according to given method ad args
-draw string annotate the image with a graphic primitive
-edge radius apply a filter to detect edges in the image
-encipher filename convert plain pixels to cipher pixels
-emboss radius emboss an image
-enhance apply a digital filter to enhance a noisy image
-equalize perform histogram equalization to an image
-evaluate operator value
evaluate an arithmetic, relational, or logical expression
-extent geometry set the image size
-extract geometry extract area from image
-features distance analyze image features (e.g. contrast, correlation)
-fft implements the discrete Fourier transform (DFT)
-flip flip image vertically
-floodfill geometry color
floodfill the image with color
-flop flop image horizontally
-frame geometry surround image with an ornamental border
-function name parameters
apply function over image values
-gamma value level of gamma correction
-gaussian-blur geometry
reduce image noise and reduce detail levels
-geometry geometry preferred size or location of the image
-identify identify the format and characteristics of the image
-ift implements the inverse discrete Fourier transform (DFT)
-implode amount implode image pixels about the center
-interpolative-resize geometry
resize image using ‘point sampled’ interpolation
-lat geometry local adaptive thresholding
-layers method optimize, merge, or compare image layers
-level value adjust the level of image contrast
-level-colors color,color
level image with the given colors
-linear-stretch geometry
improve contrast by `stretching with saturation’
-liquid-rescale geometry
rescale image with seam-carving
-median geometry apply a median filter to the image
-mode geometry make each pixel the ‘predominant color’ of the neighborhood
-modulate value vary the brightness, saturation, and hue
-monochrome transform image to black and white
-morphology method kernel
apply a morphology method to the image
-motion-blur geometry
simulate motion blur
-negate replace every pixel with its complementary color
-noise geometry add or reduce noise in an image
-normalize transform image to span the full range of colors
-opaque color change this color to the fill color
-ordered-dither NxN
add a noise pattern to the image with specific
amplitudes
-paint radius simulate an oil painting
-polaroid angle simulate a Polaroid picture
-posterize levels reduce the image to a limited number of color levels
-profile filename add, delete, or apply an image profile
-quantize colorspace reduce colors in this colorspace
-radial-blur angle radial blur the image
-raise value lighten/darken image edges to create a 3-D effect
-random-threshold low,high
random threshold the image
-region geometry apply options to a portion of the image
-render render vector graphics
-repage geometry size and location of an image canvas
-resample geometry change the resolution of an image
-resize geometry resize the image
-roll geometry roll an image vertically or horizontally
-rotate degrees apply Paeth rotation to the image
-sample geometry scale image with pixel sampling
-scale geometry scale the image
-segment values segment an image
-selective-blur geometry
selectively blur pixels within a contrast threshold
-sepia-tone threshold
simulate a sepia-toned photo
-set property value set an image property
-shade degrees shade the image using a distant light source
-shadow geometry simulate an image shadow
-sharpen geometry sharpen the image
-shave geometry shave pixels from the image edges
-shear geometry slide one edge of the image along the X or Y axis
-sigmoidal-contrast geometry
increase the contrast without saturating highlights or shadows
-sketch geometry simulate a pencil sketch
-solarize threshold negate all pixels above the threshold level
-sparse-color method args
fill in a image based on a few color points
-splice geometry splice the background color into the image
-spread radius displace image pixels by a random amount
-statistic type geometry
replace each pixel with corresponding statistic from the neighborhood
-strip strip image of all profiles and comments
-swirl degrees swirl image pixels about the center
-threshold value threshold the image
-thumbnail geometry create a thumbnail of the image
-tile filename tile image when filling a graphic primitive
-tint value tint the image with the fill color
-transform affine transform image
-transparent color make this color transparent within the image
-transpose flip image vertically and rotate 90 degrees
-transverse flop image horizontally and rotate 270 degrees
-trim trim image edges
-type type image type
-unique-colors discard all but one of any pixel color
-unsharp geometry sharpen the image
-vignette geometry soften the edges of the image in vignette style
-wave geometry alter an image along a sine wave
-white-threshold value
force all pixels above the threshold into white
Image Sequence Operators:
-append append an image sequence
-clut apply a color lookup table to the image
-coalesce merge a sequence of images
-combine combine a sequence of images
-composite composite image
-crop geometry cut out a rectangular region of the image
-deconstruct break down an image sequence into constituent parts
-evaluate-sequence operator
evaluate an arithmetic, relational, or logical expression
-flatten flatten a sequence of images
-fx expression apply mathematical expression to an image channel(s)
-hald-clut apply a Hald color lookup table to the image
-morph value morph an image sequence
-mosaic create a mosaic from an image sequence
-print string interpret string and print to console
-process arguments process the image with a custom image filter
-separate separate an image channel into a grayscale image
-smush geometry smush an image sequence together
-write filename write images to this file
Image Stack Operators:
-clone indexes clone an image
-delete indexes delete the image from the image sequence
-duplicate count,indexes
duplicate an image one or more times
-insert index insert last image into the image sequence
-reverse reverse image sequence
-swap indexes swap two images in the image sequence
Miscellaneous Options:
-debug events display copious debugging information
-help print program options
-list type print a list of supported option arguments
-log format format of debugging information
-version print version information
By default, the image format of `file’ is determined by its magic
number. To specify a particular image format, precede the filename
with an image format name and a colon (i.e. ps:image) or specify the
image type as the filename suffix (i.e. image.ps). Specify ‘file’ as
‘-‘ for standard input or output.